English
  Español
  日本語
日本語 Struggling with sticky windows or rusty pulleys? Learn how to choose the right window hardware pulley, install it easily, and keep your windows sliding smoothly.
Ever spent 10 minutes wrestling with a stuck bedroom window, only to give up and let the draft in? Or noticed your bathroom window’s pulley creaking and catching, leaving rust marks on the frame? I’ve been there. Last year, my 15-year-old kitchen sliding window became so hard to move, I thought I’d have to replace the whole frame. Turns out, the problem was just the tiny pulley hidden in the bottom track—corroded, worn, and long overdue for an upgrade. Swapping it out for a new window hardware pulley took 15 minutes, and now that window glides like it’s brand new. Let me share why these small components make such a big difference.
What Exactly Is a Window Hardware Pulley?
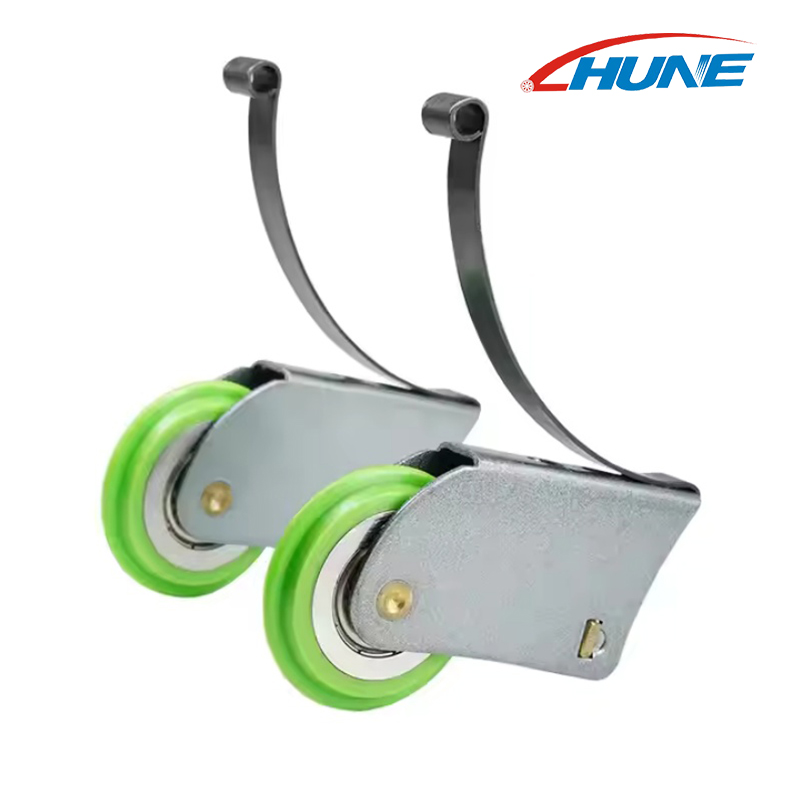
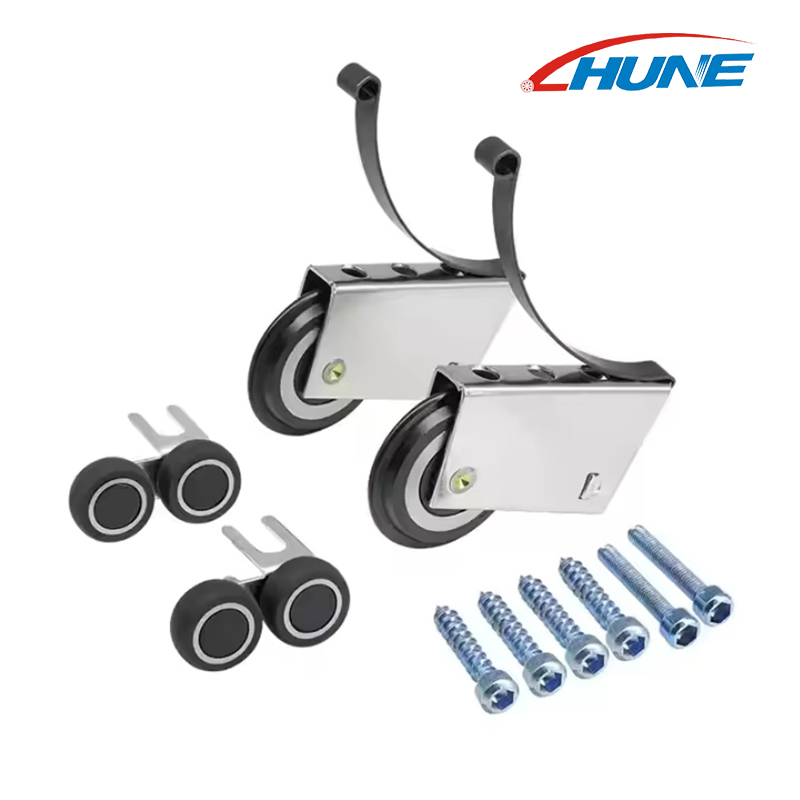
A window hardware pulley is a compact, grooved wheel (or set of wheels) designed specifically to fit into window tracks, frames, or mechanisms. Its job? To reduce friction between the window sash and the frame, making opening and closing feel effortless—whether you’re dealing with a sliding window, a casement window, or even a vintage sash window with cords.
Unlike generic pulleys, these are engineered for the unique demands of windows: they’re sized to fit standard UK window tracks (usually 16mm to 30mm wide), and their materials are chosen to withstand daily use, moisture (hello, bathroom windows!), and temperature swings. Most window pulleys are mounted via screws, clips, or slots that lock into the window’s bottom or side rails, ensuring they stay in place even with repeated movement.

Why Your Window’s Pulley Matters More Than You Think
You might not notice a window pulley until it fails. But when it does, the difference is night and day. Let me break down why upgrading to the right one is worth it:
No more struggling: A worn pulley makes windows feel 10x heavier. I once had a living room sliding window that took both hands to move—turns out, its plastic pulley had cracked, creating drag. A new pulley made it slide with one finger.
Prevents damage to your window: A sticky pulley forces you to yank on the window, which can bend frames, warp tracks, or even break the glass over time. I’ve seen neighbors replace entire windows because they ignored a faulty pulley for too long.
Blocks drafts and saves energy: When a window doesn’t close properly (thanks to a misaligned pulley), gaps let cold air in and warm air out. Fixing the pulley seals those gaps—my energy bill dropped by £15 a month after sorting my kitchen window!
Types of Window Hardware Pulleys: Which One Do You Need?
Not all window pulleys are the same. The type you need depends on your window style and environment. Here’s what I’ve learned from swapping out dozens:
1. Sliding Window Pulleys
These are the most common in ou homes, found in horizontal sliding windows (think conservatories or kitchen extensions). They’re usually small, flat pulleys (15-25mm in diameter) mounted on the bottom of the window sash, fitting into a groove in the track.
Plastic sliding pulleys: Lightweight and affordable (£2-£5 each), great for small, lightweight windows (like bathroom sliding windows). They resist moisture but can wear down quickly if the window is heavy.
Nylon sliding pulleys: More durable than plastic, with better friction resistance. I used these in my conservatory—they handle the sun’s heat without warping, and cost £4-£8 each.
Stainless steel sliding pulleys: Best for large, heavy sliding windows (like patio doors). They’re rust-proof and strong, but heavier—expect to pay £8-£15 each.
2. Sash Window Pulleys
Sash windows (those classic up-and-down wooden windows) use pulleys with cords or chains to counterbalance the sash weight. These pulleys are mounted inside the window frame, often with a wheel that guides the cord over a track.
Brass sash pulleys: Traditional and stylish, perfect for period homes. They’re corrosion-resistant but need occasional oiling to stay smooth. I used these in my 1930s terrace—they look great and cost £10-£20 a pair.
Zinc-plated sash pulleys: Budget-friendly (£5-£10 a pair) and durable, but can rust if exposed to moisture (avoid in bathrooms). Good for casual use in dry rooms.
3. Casement Window Pulleys
Casement windows (hinged on the side) use pulleys in their crank mechanisms to open and close. These are smaller, often hidden inside the crank housing, and designed to work with gears.
Plastic gear pulleys: Common in modern casement windows. They’re quiet and cheap (£3-£6), but can crack if the crank is forced.
Metal gear pulleys: Sturdier for heavy casement windows (like those in loft conversions). They cost £6-£12 and last longer, but can be noisy if not lubricated.
How to Choose the Right Window Hardware Pulley ?
Picking the wrong pulley is a waste of time and money. Here’s what I check before buying:
1. Window Type First
Sliding windows? Go for flat-bottom pulleys that fit your track width (measure the track groove—most UK sliding windows use 16mm or 20mm).
Sash windows? Match the pulley size to your sash weight (heavier sashes need stronger pulleys—check the manufacturer’s weight rating).
Casement windows? Check the crank model—pulleys are often brand-specific (e.g., Velux or Everest have unique parts).
2. Material Matters
Dry rooms (bedrooms, living rooms): Plastic or nylon works fine—they’re affordable and low-maintenance.
Damp rooms (bathrooms, kitchens): Stainless steel or brass resist rust. I learned this the hard way—plastic pulleys in my bathroom lasted 6 months before warping.
Sunny spots (conservatories, south-facing windows): Nylon or stainless steel handle UV rays better than plastic, which can melt or crack.
3. Size and Fit
Measure twice, buy once! I always note:
Pulley diameter: Too small, and it won’t support the window; too large, and it won’t fit the track. Most sliding pulleys are 15-25mm; sash pulleys are 20-30mm.
Mounting style: Some screw into place, others clip in. My kitchen sliding window uses clip-on pulleys—super easy to swap without tools.
Comparison Chart: Window Hardware Pulleys
| Pulley Type | Material | Diameter (mm) | Max Weight (kg) | Best For |
| Sliding | Plastic | 15-20 | 5-10 | Small bathroom windows |
| Sliding | Nylon | 20-25 | 10-15 | Conservatories, dry rooms |
| Sliding | Stainless Steel | 20-30 | 15-30 | Heavy patio doors |
| Sash | Brass | 20-25 | 10-20 | Period homes, dry rooms |
| Sash | Zinc-plated | 20-25 | 10-15 | Budget sash windows |
| Casement | Plastic Gear | 10-15 | 5-10 | Light casement windows |
| Casement | Metal Gear | 10-20 | 10-20 | Heavy loft casements |
Installing a Window Hardware Pulley: My 5-Step Guide
You don’t need to be a DIY pro—I’m definitely not, and I’ve done this in under 30 minutes.
For Sliding Windows:
Remove the old pulley: Tilt the window sash up and lift it out of the track. Flip it over—you’ll see the old pulleys (usually 2-4 per sash). Unscrew or unclip them.
Clean the track: Use a brush or vacuum to clear dirt, debris, or rust. A blocked track will make even a new pulley stick.
Check the new pulley: Make sure it fits the track groove. If it’s loose, add a small rubber washer (I keep these handy!) to snug it up.
Install the new pulley: Screw or clip it into place. Don’t over-tighten—plastic pulleys can crack, and metal ones can warp the sash.
Test it: Slide the window back into the track and give it a push. It should glide smoothly. If it sticks, check for debris in the pulley groove.
For Sash Windows:
Access the pulley: Open the sash and remove the stops (the wooden strips holding the sash in place) with a flathead screwdriver.
Remove the old pulley: Unscrew the pulley from the frame. If it’s rusted, spray with WD-40 and wait 10 minutes.
Thread the cord: Loop the new cord over the pulley, then attach it to the sash weight (hidden in the frame).
Secure the pulley: Screw it back into the frame, making sure the cord sits neatly in the pulley groove.
Test and adjust: Lower and raise the sash—if it’s uneven, adjust the cord length. Replace the stops when done.
How Long Do Window Pulleys Last?
It depends on use and material:
Plastic pulleys: 1-3 years (shorter in damp or heavy-use windows).
Nylon pulleys: 3-5 years (great for moderate use).
Metal (stainless steel/brass): 5-10 years (ideal for heavy or outdoor windows).
I replace mine every 4-5 years as a preventative measure—cheaper than fixing a broken window!
FAQs: Window Hardware Pulleys
I get asked these all the time by friends and neighbors:
How do I know if my pulley needs replacing?
If your window sticks, creaks, or feels heavier than usual, check the pulley. Look for cracks, rust, or a groove worn flat—those are signs it’s time to swap.
Can I mix pulley types on the same window?
Not recommended. Mismatched pulleys (e.g., one plastic, one metal) can cause uneven wear and make the window lopsided.
Do I need to lubricate window pulleys?
Yes! For metal pulleys, use a dry lubricant (like graphite) to avoid attracting dirt. For plastic/nylon, a silicone spray works best—don’t use oil, which can degrade plastic.
Final Thoughts: Don’t Overlook the Little Things
A window hardware pulley might seem tiny, but it’s the unsung hero of smooth window operation. I’ve saved hundreds by replacing pulleys instead of entire windows, and I’ve learned that choosing the right one—based on your window type, environment, and budget—makes all the difference.
Whether you’re dealing with a sticky sliding door or a creaky sash window, upgrading the pulley is a quick, affordable fix. Give it a try—you’ll wonder how you lived with that stuck window for so long.


")