English
  Español
  日本語
日本語 Sliding glass doors are great—until they start dragging, wobbling, or feeling like you're shoving a refrigerator across carpet. Most of the time, the solution is simpler than it looks: the rollers at the bottom of the door just need a small adjustment. So how do you diagnose the issue, adjust the sliding glass door rollers correctly, and know when an adjustment won't be enough?
What You're Actually Adjusting (And Why It Matters)
Sliding glass door panels typically ride on two rollers along the bottom edge. Those sliding glass door rollers sit on the track and carry most of the door's weight. Over time, normal use can cause:
- Rollers to lower slightly (door drags on the track)
- One side to drop (door becomes crooked and scrapes)
- Rollers to bind from dirt, hair, grit, or corrosion
- Track wear that makes smooth rolling harder
Adjusting the rollers changes the height and angle of the door panel so it rides cleanly on the track and seals properly against the frame.
Tools and Supplies (Keep It Simple)
Before you start, gather a few basics. You may not need all of them, but it's easier to have them nearby.
- Common tools
- Phillips screwdriver (often #2)
- Flathead screwdriver (sometimes needed)
- Allen key set (some doors use hex adjustment screws)
- Flashlight or headlamp
- Vacuum (with crevice tool)
- Stiff nylon brush or old toothbrush
- Clean rag or paper towels
- Optional but helpful
- Silicone spray (non-greasy, safe for many tracks)
- Avoid oil-based lubricants; they attract grit.
- Thin wood shims or door wedges
- Tape measure (for checking height consistency)
Before You Adjust: Quick Diagnosis
A little diagnosis prevents you from "fixing" the wrong problem.
1) Check the symptoms
- Door scrapes the track: rollers likely too low, or track is dirty/damaged.
- Door rubs the side jamb / doesn't latch: one roller may be higher than the other (door is out of square).
- Door rolls, but feels crunchy or uneven: track debris or worn rollers.
- Door is hard to move near one end only: track may be bent, dented, or dirty in a specific spot.
2) Inspect the track
- Use a flashlight and look along the bottom track.
- If you see sand, pet hair, or small stones, cleaning may solve 70% of the problem.
- If you see a flattened ridge, dent, or cracked track, adjustment might help a little, but the underlying issue could remain.
Step 1: Clean the Track First (Don't Skip This)
Many roller adjustments fail because debris keeps acting like a speed bump.
- Vacuum the track thoroughly, especially the corners.
- Brush the groove with a stiff nylon brush.
- Wipe with a damp rag, then dry.
- If appropriate, apply a light silicone spray to the track and wipe away excess.
- The goal is a thin film, not a slippery puddle.
Test the door after cleaning. If it's now smooth and aligned, you may not need adjustment at all.
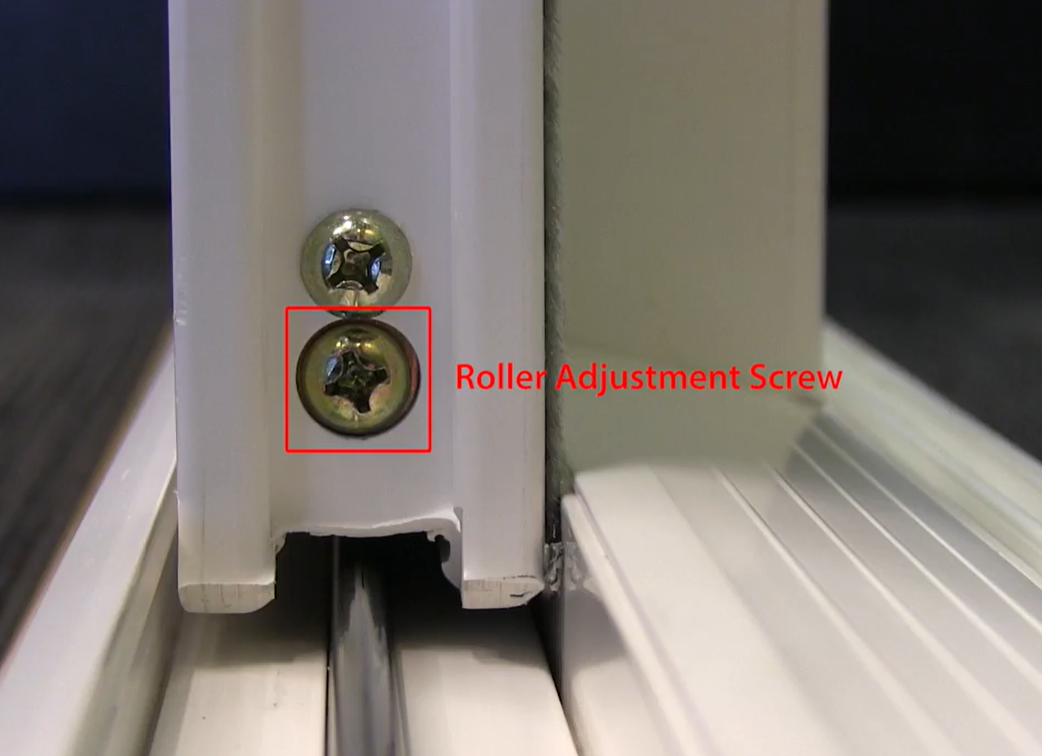
Step 2: Find the Roller Adjustment Screws
Most sliding doors have two adjustment screws—one near each bottom corner of the sliding panel.
Where to look
- On the inside face of the sliding panel, close to the bottom
- Sometimes covered by small plastic caps
- Occasionally located on the edge of the door near the bottom
Use a flashlight and look for:
- A Phillips screw head
- A hex/Allen head
- A screw recessed in a small hole (often 1/4"–3/8" wide)
Quick tip
You may also see larger screws that hold the frame together. The roller adjustment screw is typically:
- Smaller
- Near the bottom corner
- Set into a dedicated access hole
Step 3: Reduce Pressure on the Rollers (Optional, But Smart)
If the door is heavy or badly out of alignment, take a little load off the rollers to make adjustment easier and prevent stripping the screw.
- Slide the door halfway open (so you can access both corners).
- Place a thin shim or wedge under the outer bottom edge of the door very gently, just enough to support a bit of weight.
- (A folded rag over a shim helps prevent scratching.)
If the door is moving fine and you're making a small tweak, you can often skip this.
Step 4: Adjust the Rollers—Small Turns, Big Difference
Here's the core of the job. You'll be raising or lowering each roller to:
- stop scraping, and
- make the door sit square in the frame.
General rule of thumb (but confirm by testing)
- Turning the adjustment screw clockwise often raises that side of the door.
- Turning it counterclockwise often lowers that side.
Because designs vary, don't rely on the direction alone—watch what the door does.
The step-by-step method
- Start with one corner (say, the latch side).
- Turn the screw 1/4 turn.
- Check:
- Does that corner lift slightly?
- Does the scraping reduce?
- Repeat in small increments until the door rolls freely without rubbing.
Then move to the other corner and do the same.
How to tell you've raised it enough
- The door slides without metal-on-metal scraping.
- The panel remains stable and doesn't wobble.
- The gap between the door and the frame looks even.
Step 5: Square the Door (So It Seals and Locks)
A door can roll smoothly and still be misaligned—leading to drafts, rattling, or a latch that won't catch.
What "square" looks like
- The vertical edge of the sliding panel should be parallel to the side jamb.
- The latch should line up cleanly with the keeper.
- The top gap should look consistent.
Squaring technique
- If the top of the door leans toward the frame on one side, raise the opposite bottom corner slightly.
- If the latch doesn't meet the keeper, adjust height in tiny steps until it does.
A practical approach:
- Close the door fully.
- Look at the vertical gap along the latch side.
- Adjust one roller at a time by 1/4 turn.
- Close and test again.
Step 6: Test Like You Mean It
Once it feels better, do a real-world test:
- Slide open/close 10–15 times
- Try gentle operation with two fingers (it should glide, not grind)
- Check for:
- rubbing
- wobble
- "bump-bump" rolling
- latch alignment
- drafty gaps
If it improves but still isn't great, you may be dealing with worn rollers or track damage.
If Adjustment Doesn't Work: Common Culprits
Sometimes the screws turn… and nothing changes. Here's why.
1) Stripped adjustment screw
- The screwdriver spins but the roller doesn't move.
- Fix:
- you may need to remove the door panel to replace the roller assembly or the adjustment hardware.
2) Worn or broken rollers
- Signs:
- Door still drags even when "raised"
- Grinding noise persists
- Door feels bumpy no matter how clean the track is
- Fix:
- Roller replacement is usually the real solution.
3) Damaged or bent track
- Signs:
- A specific spot always feels rough
- Visible dents or a flattened ridge
- Fix:
- Track repair or track cap replacement (depends on door type).
4) Door is too high after adjustment
- Over-raising can cause:
- The top of the panel to rub the upper track
- Difficulty locking
- Increased resistance
- Fix:
- Back off both rollers in small equal increments.
Safety Notes (Because Glass Is Not Forgiving)
Sliding glass door panels are heavy and awkward. A few precautions keep this job uneventful:
- Don't force stuck screws; use the correct driver size.
- Support the panel if it feels unstable.
- Keep fingers away from pinch points near the jamb and track.
- If the panel needs to be removed for roller replacement and you're solo, consider help—lifting and tilting a glass panel alone can go sideways fast.
Maintenance Tips to Keep It Gliding
Once it's rolling smoothly, a little maintenance prevents repeat trouble:
- Vacuum the track monthly if you have pets or sandy outdoor areas.
- Clean and wipe the track seasonally.
- Use silicone sparingly—too much turns dust into paste.
- Avoid slamming; it knocks rollers out of alignment over time.
Getting a sliding glass door back to a smooth glide usually comes down to tiny, deliberate tweaks. Start by clearing the track—grit and pet hair can imitate a roller failure and make the door feel heavy. Next, locate the two roller adjustment screws at the bottom corners and make changes in small 1/4-turn steps, testing the slide after each adjustment. Aim to raise or lower each side until the panel sits level, moves quietly, and lines up with the latch. At Hune, we also remind homeowners: if turning the screws doesn't improve anything, the rollers may be damaged or the track could be bent or worn.


")