English
  Español
  日本語
日本語 Sticky cabinet sliding doors are one of those small household annoyances that slowly become a daily ritual: pull, wiggle, lift, shove—repeat. The good news is that the most common cause is also one of the most fixable: worn or damaged rollers. Rollers take the brunt of the load, collect dust, flatten over time, and eventually stop rolling like rollers should. When that happens, the door starts dragging, binding, or jumping along the track.
Replacing the rollers is usually faster (and cheaper) than replacing the whole door system. With a bit of care—especially if the doors are glass—you can restore that smooth, "one-finger glide" feel in an afternoon.
Cabinet Sliding Door Repair Steps Explained
|
Step |
What to Do |
Why It Matters |
|
Identify the Problem |
Check for sticking, grinding noise, uneven movement, or doors jumping off the track. |
Confirms that worn rollers—not alignment or debris—are causing the issue. |
|
Remove the Cabinet Door |
Lift or tilt the door carefully to disengage it from the track. |
Provides safe access to the rollers without damaging the track or panels. |
|
Inspect Old Rollers |
Look for flat spots, cracks, loose bearings, or excessive wear. |
Helps confirm replacement is necessary and guides correct roller selection. |
|
Choose the Right Replacement |
Match wheel size, profile, load rating, and mounting style to the existing system. |
Ensures smooth sliding and prevents premature wear or misalignment. |
|
Install New Rollers |
Secure the new rollers firmly, ensuring bearings spin freely. |
Proper installation restores smooth motion and reduces noise. |
|
Clean and Check the Track |
Remove dust, debris, or buildup from the track before reinstalling the door. |
Prevents new rollers from wearing prematurely and improves glide quality. |
|
Reinstall and Adjust |
Place the door back on the track and fine-tune height or alignment if adjustable. |
Ensures even door movement and eliminates sticking or rubbing. |
|
Test the Sliding Action |
Slide the door several times to confirm smooth, quiet operation. |
Verifies that worn rollers were the root cause and the fix is successful. |
1) Diagnose the Problem Before You Buy Parts
Before blaming the rollers, confirm what's actually causing the sticking. Cabinet sliders can bind for several reasons, and you don't want to replace hardware only to discover the track is bent or the cabinet is out of square.
Common symptoms that point to worn rollers
- The door drags even when the track looks clean
- The door jerks instead of rolling smoothly
- You hear grinding, clicking, or squeaking that persists after cleaning
- The door feels harder to move near the middle (flat spots on wheels)
- The door has started to lean, rub, or scrape at one corner
Quick checks (5 minutes)
- Clean the track first: Vacuum debris and wipe with a damp cloth; dry fully.
- Look for physical damage: dents, bent track lips, loose screws, swollen wood around the track.
- Check door alignment: Is the gap even? Does one corner rub the frame?
- Lift test: Gently lift the door while sliding it. If lifting makes it move easier, the rollers are likely worn or misadjusted.
If cleaning and minor alignment don't solve it, roller replacement is usually the next best move.
2) Understand Your Sliding Door Setup (So You Get the Right Rollers)
Cabinet sliding doors typically use one of these arrangements:
- Bottom-rolling system: weight sits on bottom rollers; top track guides
- Top-hung system: weight hangs from top rollers; bottom guide prevents swinging
- Dual-roller systems: rollers at both top and bottom for stability
What to identify before shopping
- Where the rollers are (top, bottom, or both)
- Track shape: U-channel, V-track, flat rail, or a formed lip
- Roller wheel profile: flat, concave, V-groove, etc.
- Roller mounting style: screw-on bracket, clip-in, riveted axle, adjustable housing
- Door material and weight: wood, MDF, framed glass, mirror, etc.
Tip: Take the door off first if you can do it safely, then bring the old roller to the store (or match it online). Measurements beat guesswork every time.
3) Tools and Supplies (Keep It Simple)
You usually won't need a full workshop. Here's the typical kit:
- Screwdriver set (Phillips/flat)
- Tape measure or calipers (helpful for wheel diameter)
- Vacuum + rag
- Mild cleaner (for track grime)
- Silicone spray or dry PTFE lubricant (optional; avoid oily lubes that attract dust)
- Replacement rollers (matching size/profile/load)
- Small container for screws (so they don't teleport into another dimension)
Safety note for glass doors
If your cabinet doors are glass or mirrored, wear gloves and work slowly. Support the panel evenly—glass hates twisting forces.
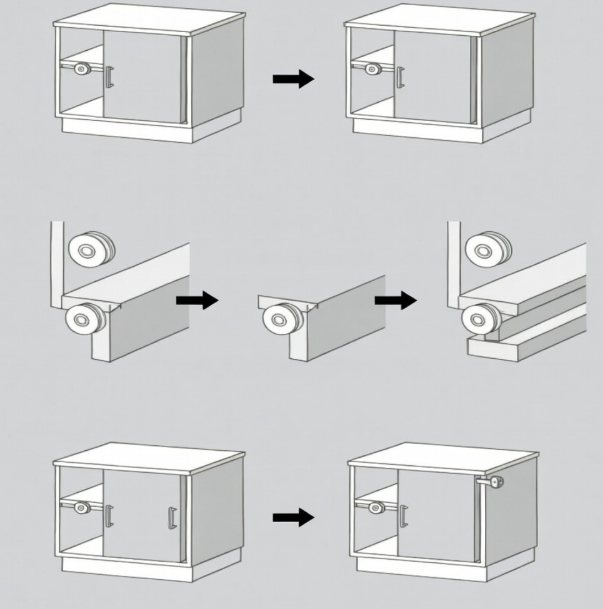
4) Remove the Sliding Door Without Damaging It
Removal depends on the system, but most cabinet doors come out with a lift-and-tilt motion.
Typical removal method (common bottom-roller cabinets)
- Slide the door to the center of the opening (more room to maneuver).
- Lift the door upward to clear the bottom track lip or disengage the bottom rollers.
- Tilt the bottom outward, then lower the top edge out of the upper track.
If the door won't lift much, look for:
- Anti-jump clips in the top track (small tabs or screws preventing lift-out)
- Stop blocks at track ends
- Adjustment screws that have lowered the rollers too far
Place the door flat on a soft surface (towel or cardboard) to avoid scratching.
5) Inspect the Rollers: What "Worn" Looks Like
Once the door is out, rollers often tell their story clearly.
Signs you should replace (not just clean)
- Wheel is cracked, chipped, or missing chunks
- Wheel doesn't spin freely (bearing seized or axle corroded)
- Flat spots: wheel looks slightly "squared"
- Roller housing is bent or loose
- Adjustment mechanism is stripped
If the wheel is dirty but structurally fine, cleaning can help—but if you've got sticking plus visible wear, replacement is the long-term fix.
6) Choose the Correct Replacement Rollers
This step determines whether your repair feels professional—or turns into a "why is it worse now?" moment.
Match these specs
- Wheel diameter (very important for door height and fit)
- Wheel width (must sit correctly in the track)
- Wheel profile (flat vs grooved vs V-shaped)
- Mounting hole spacing / bracket type
- Adjustability range (especially if the old system used height adjustment)
- Load rating: choose at least what the door needs, with margin
Material choice (quick guidance)
- Nylon/POM (engineering plastic): quiet, smooth, great for most cabinet tracks
- Rubberized wheels: very quiet but can add drag and attract grime
- Metal wheels: durable but louder; can wear softer tracks faster
For most cabinet sliding doors, quality plastic wheels with decent bearings are the sweet spot.
7) Replace the Rollers (Step-by-Step)
Rollers are usually attached near the bottom corners (or top corners in top-hung systems).
Step-by-step replacement
- Photograph the old roller in place before removal (best free insurance).
- Remove the screws holding the roller bracket/housing.
- Compare old and new side by side: diameter, profile, mounting alignment.
- Install the new roller loosely at first (don't fully tighten if adjustment is needed).
- If the roller has an adjustment screw, set it mid-range. This gives room to fine-tune later.
Tighten mounting screws firmly but don't over-torque into particleboard—stripped holes are a common setback.
If screw holes are stripped
- Use slightly larger screws, or
- Fill holes with wood glue + toothpicks, let set, re-drive the screw
8) Clean and Tune the Track Before Reinstalling
New rollers on a dirty track is like putting new tires on a road full of nails.
Track tune-up checklist
- Vacuum out grit (especially corners)
- Wipe with mild cleaner; dry thoroughly
- Check for loose track screws and tighten
- Look for dents; gently straighten if possible
- Apply a dry lubricant sparingly (optional)
Avoid grease and heavy oils inside cabinet tracks—they trap dust and eventually create sticky paste.
9) Reinstall the Door and Adjust for a Smooth Glide
Reinstallation is usually the reverse of removal:
- Insert the top edge into the upper track
- Lift and set the bottom rollers onto the bottom track
- Slide slowly end-to-end to check for binding
Adjustment tips
- If the door scrapes the bottom: raise the rollers (or lower the top-hung adjustment)
- If the door rubs the side frame: adjust left/right height slightly to square it
- If doors overlap unevenly (two-door cabinets): match heights so the meeting stile aligns
A good adjustment is subtle: tiny turns, frequent testing.
10) Test Like You Mean It (So It Stays Fixed)
Once it feels good, do a more deliberate test:
- Slide the door fully open and closed 10–20 times
- Listen for clicking (often mis-seated wheel profile)
- Check that the door doesn't jump the track at the ends
- Ensure stop blocks are in place and anti-jump clips (if any) are reinstalled
If the glide is smooth in the middle but sticky at one end, inspect the track at that spot—there's often a dent, screw head proud of the surface, or debris packed in the corner.
11) Common Mistakes (and How to Avoid Them)
A few pitfalls show up again and again:
- Buying "close enough" rollers: wrong profile = noise + premature wear
- Ignoring the track: debris and dents will defeat new wheels
- Over-tightening screws into particleboard: leads to wobble and repeat failure
- Skipping adjustment: even perfect rollers need alignment
- Using greasy lubricants: smooth today, sticky next month
12) When Roller Replacement Isn't Enough
Rollers can't compensate for certain structural issues. Consider deeper fixes if:
- The cabinet is racked out of square (door always binds diagonally)
- The track is severely bent or cracked
- The door panel is warped or swollen from moisture
- Mounting points are broken beyond repair
In those cases, track replacement—or even rebuilding the mounting surface—may be the real solution.
Sticky cabinet sliding doors are almost always a roller problem in disguise. When the wheels get worn, flat, or misaligned, the door fights to move — but replacing them restores the one thing the system truly relies on: perfectly round, freely spinning rollers with the correct profile and proper alignment.
Hune, a professional manufacturer of high-quality plastic rollers for glass and cabinet sliding systems, recommends doing just three things to bring back that smooth, effortless glide:
Choose replacement rollers that match your track's diameter, groove profile, and load requirements exactly
Thoroughly clean and inspect the track so the new rollers have a clean, smooth surface to roll on
Carefully adjust the door so it hangs square, stable, and completely free of rubbing or binding
When everything is properly matched and fine-tuned, the improvement is immediate — and surprisingly satisfying. The door suddenly remembers how it's supposed to move: quietly, smoothly, and exactly as intended.
With Hune rollers, you're not just fixing a sticky door — you're giving it back the reliable, low-friction performance it was designed for.


")