English
  Español
  日本語
日本語 Sliding window rollers are small parts with an outsized job: they carry the weight of the sash, keep movement smooth, and hold alignment so the window seals properly. When rollers get neglected, the window starts to drag, wobble, or jump the track—often long before the glass or frame shows any age. The good news is that roller maintenance is mostly simple, repeatable care: keep things clean, control friction, prevent corrosion, and replace wear parts before they damage the track.
The Maintenance Toolkit
- Before you begin, gather the right supplies. Using the wrong tools—specifically the wrong chemicals—can accelerate damage.
- Vacuum with a crevice tool: For removing loose debris.
- Stiff-bristled brush: An old toothbrush or a dedicated grout brush works perfectly.
- Compressed air: To blow out hidden grit.
- Silicone-based lubricant spray: Crucial. (Do not use standard petroleum-based sprays).
- Phillips head screwdriver: For height adjustments.
- Clean rags: Microfiber is best to avoid leaving lint behind.
How to Clean Sliding Window Rollers (and Tracks)
Sliding windows and patio doors work so much better when the rollers and tracks are free of grit and gunk. This quick cleaning routine usually takes 20–30 minutes and makes a noticeable difference in how easily they slide.
What You'll Need
- Vacuum cleaner with a slim crevice tool attachment
- An old soft toothbrush (or similar small, gentle brush)
- A couple of clean cloths or rags (one can be lightly damp, the rest dry)
- Mild cleaner: either a splash of dish soap in warm water or a half-and-half mix of white vinegar and water
1. Pull Out Loose Dirt First
Slide the window or door all the way open so you have full access. Attach the narrow crevice tool to your vacuum and run it slowly along the entire bottom track—and the top track if you can reach it. Go back and forth a few times to pull out sand, dust, pet hair, dried leaves, and any small debris. This step removes most of the loose stuff right away.
2. Brush Off the Stuck-On Grime
Switch to the soft toothbrush. Gently scrub the rollers, working around the wheels and into the little grooves where black or gray buildup collects. Also brush the inside walls of the track, the corners, and any metal or plastic guides. Every so often, tap the brush against the edge of a trash can to shake off the loosened dirt. Be gentle—hard scrubbing can scratch plastic rollers or push grit deeper.
3. Wipe It Down
Dampen one cloth with your mild cleaning solution—just enough to make it feel moist, not soaking wet. Carefully wipe each roller, turning them by hand if you can so you clean all the way around. Then run the cloth along the full length of the track, hitting the ends and corners where crud tends to pile up. If something is really stubborn, fold to a clean section of the cloth and go over it again.
4. Dry It Completely
Use a dry cloth (or a fresh dry rag) to wipe every surface you just cleaned. Make sure the rollers feel dry and spin freely without any sticky or damp spots. Getting rid of all moisture is important—leftover water invites rust on metal parts and can encourage mold or more dirt buildup, especially in humid or coastal areas like Los Angeles.
Maintenance Notes
- Repeat this every 3–4 months, or more often if you have trees nearby, live close to the beach, or use the door a lot.
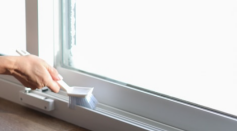
- Once everything is bone-dry and the rollers turn smoothly, a very light mist of silicone spray lubricant on the track and rollers can keep things gliding nicely (avoid regular WD-40—it tends to attract dust over time). Wipe away any excess.
- If the rollers still feel rough, make grinding noises, or look cracked/worn after cleaning, they're probably due for replacement rather than more scrubbing.
Done right, your sliders should feel almost effortless again. Small job, big payoff.
Quick Guide to Cleaning Sliding Window Rollers and Tracks
|
Step |
Action |
Key Tips |
|
Preparation |
Gather vacuum, soft brush, cloths, and mild cleaner. |
Avoid harsh chemicals; mild soap or vinegar works best. |
|
Remove Loose Debris |
Vacuum tracks thoroughly using a crevice tool. |
Clears sand, dust, hair, and leaves quickly. |
|
Clean Rollers & Tracks |
Gently brush rollers and track grooves. |
Use light pressure to avoid damage. |
|
Wipe Surfaces |
Wipe rollers and tracks with a damp cloth. |
Focus on corners where grime collects. |
|
Dry & Finish |
Dry completely; apply light silicone lubricant if needed. |
Avoid oil-based sprays; replace worn rollers if rough. |
Lubrication: Ensuring Smooth Operation
After a thorough cleaning and making sure the rollers and tracks are fully dry, a light application of lubricant brings back that smooth, effortless glide. Friction from regular use slowly roughs up the rolling surfaces, so the window or door starts to drag, squeak, or feel stiff. The right lubricant cuts down on that drag, quiets things down, and helps the rollers wear more evenly over time.
Steps to Lubricate Properly
1. Select a Suitable Lubricant
Go for a silicone spray designed for windows, doors, or tracks, or a dry PTFE-based (Teflon-like) lubricant made for sliding hardware. These dry quickly, leave almost no residue, and resist picking up dust.
Steer clear of oil-based products, WD-40, household oils, or any thick grease. Those kinds of lubricants turn into a sticky trap for dirt, pet hair, and pollen—especially in a place like Los Angeles where we get plenty of airborne particles—and you'll end up with worse sticking than before.
2. Apply It Lightly
Give the can a good shake.
Hold it close (roughly 4–6 inches away) and give each roller a very brief spray—aim right at the wheels where they roll against the track.
Then lightly mist the track itself: a short pass along the bottom rail where the rollers ride, and—if you can reach it—a touch on the top channel.
Keep it minimal. You're aiming for a thin, even coating, not a wet film or drips running everywhere.
3. Distribute the Lubricant
Right after spraying, slide the window or door all the way open, then all the way closed, about 10–15 times in a row.
This back-and-forth motion spreads the lubricant evenly across the rollers and the full length of the track. Most people notice the improvement after just a few cycles—the movement suddenly feels lighter and quieter.
4. Remove Any Excess
Take a clean, dry cloth or paper towel and gently wipe the track surfaces and the exposed parts of the rollers.
Pick up any small beads of overspray or tiny wet spots that landed outside the working area. This quick wipe keeps excess from attracting dust and helps the whole setup stay cleaner longer.
How Often Should You Lubricate?
Plan to do this every 6–12 months after a cleaning session.
If the slider sees heavy daily use (like the main patio door or kitchen access), or if you live in a dusty, salty, or humid spot around Los Angeles, lean toward every 6 months.
The idea is to stay ahead of wear—keep the action smooth so you never get to the point of grinding noises or hard-to-move panels.
This step usually takes under 5 minutes once everything is clean and dry. It's simple, but it makes a big difference every time you reach for the handle.
Inspecting for Wear and Tear
Besides keeping everything clean and giving the rollers a light touch of lubricant now and then, it's smart to take a good look at them periodically. These little wheels handle a lot—rolling back and forth countless times, picking up grit, dealing with moisture, heat, cold, and sometimes heavy use on bigger doors. Checking them regularly lets you spot trouble before a window gets so stiff it won't budge properly or starts scraping grooves into the track.
Things to Check For
- Resistance or Unusual Sounds When the window feels hard to push or pull, or you start hearing scraping, grinding, rattling, or squeaking with every movement, the rollers have likely worn smooth spots, flattened out, or collected stubborn residue that regular cleaning couldn't reach.
- Visible Problems on the Rollers Crouch down and inspect each wheel carefully:
- Cracks splitting through the plastic or nylon
- Small pieces chipped or broken off the edges
- Deep scratches, worn-flat areas, or heavy scoring right where the wheel touches the track
- Rust or pitting showing up on any metal parts If any of those show up, replace the rollers without delay—keeping damaged ones in service just keeps wearing away at the track and throws extra stress across the frame.
- Movement That Feels Lopsided If the window drags noticeably more on one side, or it sits a little crooked when fully closed, one roller has probably worn down faster than its mate. That imbalance pulls unevenly on the sash, wears out weather seals quicker, and can make the whole thing harder to latch securely over time.
Any of these signs—or if cleaning and fresh lubricant still leave the window feeling rough—means it's time for new rollers.
Replacing Worn Rollers
Swapping them out is usually something you can handle yourself with a bit of patience and basic care.
- First: Get the Panel Out Slide the window or door open partway so you have room to work. Look along the bottom or sides for small screws, adjustment bolts, or holding pins—these keep the panel from lifting out accidentally. Take them out. Lift the top of the sash up into the upper track to clear the bottom, then tilt the bottom outward and ease the whole panel free. For larger or heavier patio doors, get a second pair of hands to avoid any risk to the glass. Lay the panel flat on something soft like old towels or a blanket.
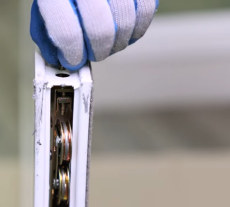
- Next: Pull the Old Rollers With the sash flat:
- Turn it so the bottom edge is easy to reach.
- Rollers are normally held in place by tiny screws, springy clips, or push-fit tabs—loosen or gently release them.
- Notice exactly how everything sits and which direction the wheels face—take a quick photo with your phone if it helps you remember.
- Keep one old roller handy or jot down its size so you can match the replacements exactly.
- Finally: Put in the New Ones
- Set each new roller back into the same spot and the same way the old one sat.
- Fasten them down with the screws you removed (or any new ones that came with the parts), or snap/clip them securely.
- Give each wheel a spin by hand to make sure it turns freely and sits straight without wobbling.
- Slide the panel back in: hook the top into the upper track first, then lower the bottom so the rollers drop into the lower rail.
- Put back any screws or pins you took out earlier.
- Open and close the window a few times to check. It should glide evenly and quietly, close tightly, and latch without forcing anything. If there are adjustment screws on the rollers, turn them a little so the sash sits level and seals nicely against the frame.
New rollers don't cost much and the job isn't complicated once you've done it a time or two. Fixing them when wear first appears keeps the track from getting chewed up and saves you from dealing with bigger frame or glass issues later on. If the window is older or the rollers look unusual, take one along to a nearby window supply place—they can usually find a perfect match right away.
Keeping Moisture Away from Sliding Window Rollers
Water and humidity rank among the toughest enemies for sliding window rollers. In damp or rainy conditions, moisture sneaks into the tracks, bringing rust to metal pieces, encouraging mold, and gradually breaking down the rollers until they stick, seize, or wear out way too soon.
- Steps to Keep Moisture at Bay
- Pick a Moisture-Resistant Lubricant Look for silicone sprays or dry lubricants made to handle water exposure. These form a protective layer that helps repel moisture and keeps rust or corrosion from taking hold on the rollers and track.
- Fit Better Weather Seals Examine the edges where the sliding panel meets the rest of the frame. Replace any old, cracked, or missing weatherstripping with fresh foam, vinyl, or brush seals. Solid seals stop rain, blowing mist, and heavy condensation from slipping inside and collecting around the rollers.
- Pick a Moisture-Resistant Lubricant Look for silicone sprays or dry lubricants made to handle water exposure. These form a protective layer that helps repel moisture and keeps rust or corrosion from taking hold on the rollers and track.
- Clear the Drainage Openings Sliding window and door frames usually have small weep holes or drain channels along the bottom. These let water escape instead of pooling. Every so often, poke them open with a thin wire, toothpick, or burst of compressed air—debris, leaves, and tiny webs love to clog them and turn the track into a puddle trap.
- Seasonal Care for Sliding Window Rollers
- Shifting weather patterns put different stresses on the rollers, so slight adjustments as the year progresses help them hold up better.
- Winter Focus Cooler conditions cause metal rollers to shrink a touch, which adds stiffness and extra friction. Rely on a lubricant meant for lower temperatures so it continues working well even when things feel chilly. In wetter periods, give the tracks more frequent wipes to remove standing water before it settles in.
- Summer Focus Warmth makes plastic or rubber-like rollers soften, leaving them more likely to develop flat areas, distort, or wear away quicker under the panel's weight. Increase cleaning during hotter stretches when dust and airborne particles gather faster, and keep watch for early signs of softening or uneven wear. If those appear, replace the rollers before extended heat forces them past their limit right when fresh breezes are most welcome.
Taking simple steps against moisture and matching care to seasonal changes requires minimal extra work yet greatly lengthens roller life. Combine these practices with steady cleaning and light lubrication, and your sliding windows stay dependable and easy to use through every part of the year.
Taking care of your sliding window rollers doesn't take much time, but the payoff lasts for years. A straightforward routine of clearing away dust and debris, adding a thin layer of the right dry or silicone lubricant, and giving them a quick look-over for wear keeps everything moving quietly and effortlessly. This basic upkeep cuts down on friction, stops the rollers from developing flat or uneven spots, and shields the track from extra wear that could lead to bigger problems down the road.
As a manufacturer specializing in sliding window rollers, Hune strongly suggests folding this kind of maintenance into your regular home or building care schedule. Spending just a few minutes here and there now helps your sliding windows stay smooth, reliable, and close to like-new condition for a long time to come. Small, consistent effort prevents most common issues and keeps your windows operating the way they should—without sticking, grinding, or forcing you to push harder than necessary.


")