

 English
 Español
 日本語
日本語Track damage rarely happens because of a bad roller. It happens because of a rushed installation. Most scratched rails, bent grooves, and premature wheel wear can be traced back to a handful of preventable mistakes made in the first ten minutes of mounting, long before the door ever gets tested for smooth operation. Understanding the correct sequence of steps, and knowing which small details actually matter, is what separates an installation that lasts for years from one that starts squeaking within a few months.
Why Track Damage Happens in the First Place
Before getting into the steps themselves, it helps to understand what actually causes damage during installation, since most of the precautions below exist specifically to prevent one of these four issues.
Misalignment During the Initial Fit
When a roller bracket is fastened at a slight angle, even a few degrees off, the wheel makes contact with the track edge instead of the intended rolling surface. Over time, this uneven contact point wears a groove into the rail that was never designed to bear that kind of pressure.
Over-Tightened Mounting Screws
Applying excessive torque when securing the roller bracket can warp the bracket itself or pull it slightly out of its intended position, which shifts how the wheel sits against the track before the door has even moved once.
Debris Trapped During Installation
Metal shavings from drilling, leftover packaging material, or construction dust can get pressed into the track during mounting and act as an abrasive the moment the door starts sliding.
Incorrect Roller Height Adjustment
Many roller systems include a height adjustment screw for fine-tuning door clearance. Skipping this step, or adjusting it without checking contact pressure against the track, often results in the wheel riding too low or too high, creating uneven wear on one side of the rolling surface.
Tools You Should Have Ready Before Starting
Having the right tools on hand before beginning the installation reduces the temptation to improvise with whatever is available, which is often where avoidable damage starts.
| Tool | Purpose |
|---|---|
| Torque-limiting screwdriver or manual driver | Prevents over-tightening of bracket screws |
| Spirit level (short and long) | Confirms both the track and the door panel sit level |
| Soft cloth or brush | Clears dust and shavings from the track before final fitting |
| Measuring tape | Verifies roller spacing and door panel alignment |
| Adjustable wrench (if height adjustment bolts are present) | Fine-tunes roller height without stripping the bolt head |
| Masking tape | Marks bracket positions before drilling, avoiding guesswork |
Step 1: Inspect the Track Before Touching the Roller
It's tempting to start with the roller since that's the part being installed, but the track deserves a check first.
Run a hand along the entire length of the rail, feeling for burrs, dents, or uneven sections that might not be visible at a glance. A track with even a small manufacturing imperfection can cause a brand-new roller to wear unevenly from the very first use, and catching that early saves a callback later.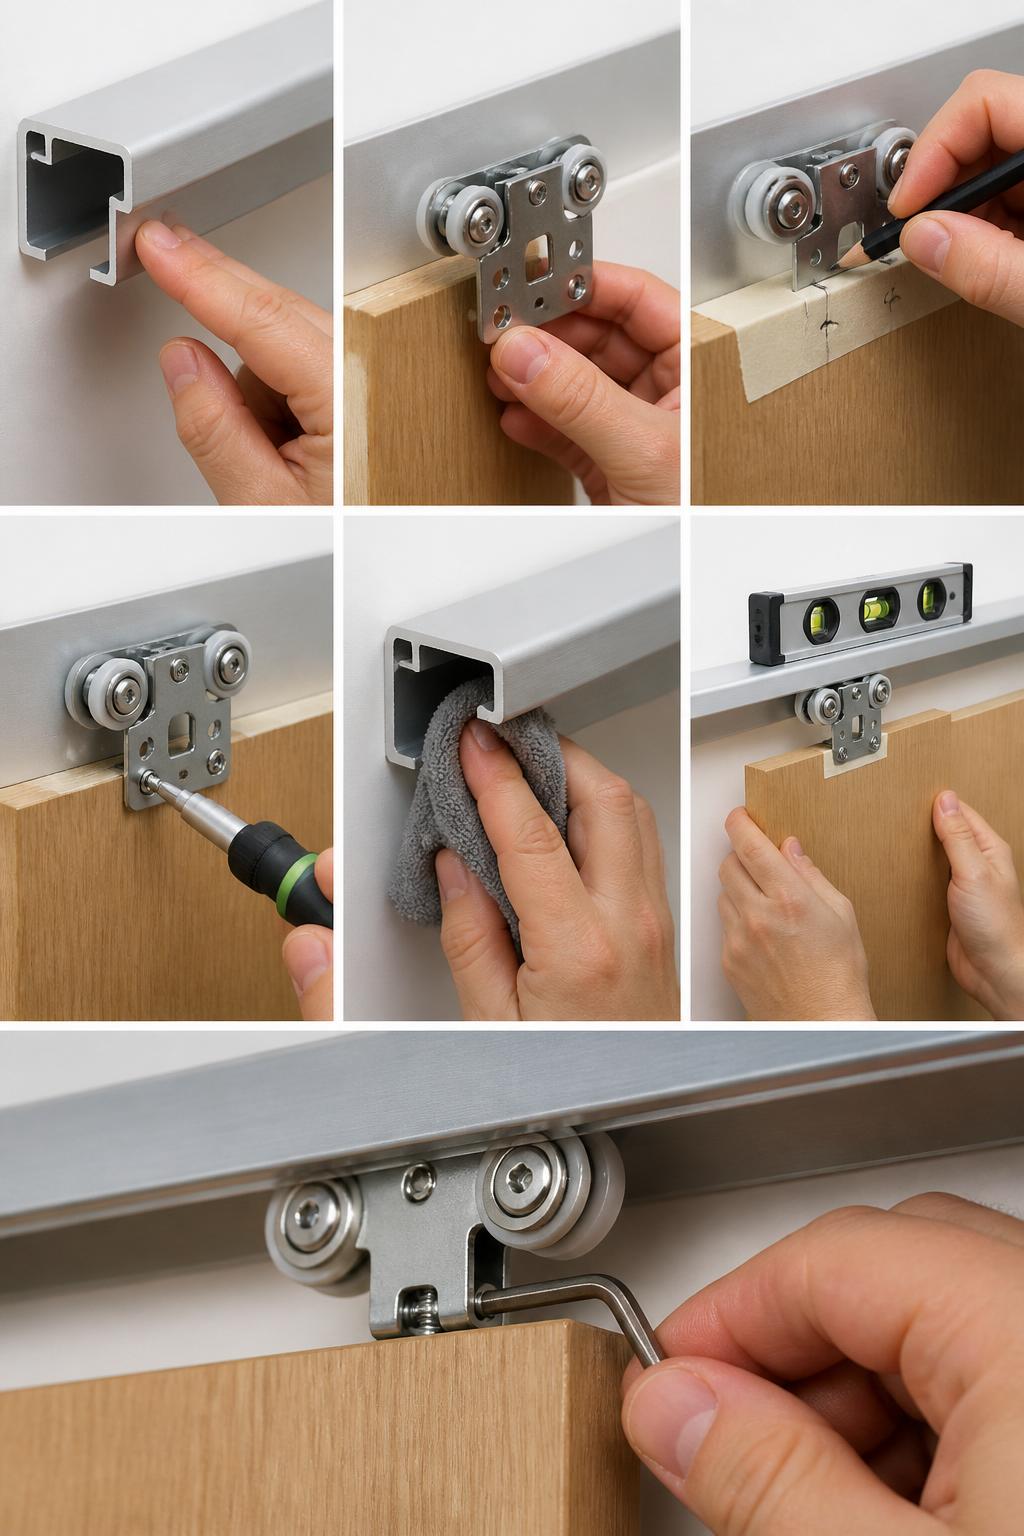
If the track shows any visible scoring or rough patches from a previous installation, lightly clean the area and confirm whether the damage is surface-level or deep enough to affect the rolling path. A shallow scuff is usually cosmetic. A groove deep enough to catch a fingernail is worth flagging before proceeding, since a new roller running over that spot will likely wear at an accelerated rate regardless of the roller material chosen.
Step 2: Dry-Fit the Roller Before Drilling Anything
Before committing to a single screw hole, hold the roller bracket in position against the door panel and check the alignment against the track without fastening anything.
This dry-fit step is often skipped because it feels redundant, but it's the easiest way to catch a spacing miscalculation before it becomes a permanent hole in the door panel.
While dry-fitting, confirm two things:
- The wheel makes contact with the center of the rolling surface rather than favoring one edge.
- The bracket sits flush against the door panel without any gap that would force the screws to pull it into place under tension.
A bracket that has to be forced flat during tightening is a common early sign of misalignment that will eventually transfer stress into the track.
Step 3: Mark and Drill With Consistent Spacing
Once the dry-fit confirms correct positioning, use masking tape and a pencil to mark each screw location precisely rather than eyeballing it.
This matters more on multi-roller installations, where even a small spacing inconsistency between brackets can create uneven load distribution across the door's total weight.
When drilling, use a bit sized appropriately for the screw type specified by the roller manufacturer. A pilot hole that's too small forces excessive torque during screw insertion, which is one of the more common ways brackets end up slightly warped before the door has even been hung.
Step 4: Mount the Bracket at the Correct Torque
This is where a torque-limiting driver earns its place in the tool list.
Tighten each screw gradually and evenly, checking the bracket's flatness against the door panel periodically rather than driving one screw fully home before moving to the next. Uneven tightening sequence, not just excessive force, is a frequent cause of bracket warping that's difficult to diagnose after the fact.
If the roller system includes a height adjustment mechanism, leave it in a neutral or mid-range position at this stage rather than fully extended or retracted. Fine-tuning height comes later, once the door is actually hanging on the track and its true resting position can be observed.
Step 5: Clean the Track Immediately Before Hanging the Door
Even a clean-looking track can carry fine dust from the drilling process.
Wipe the entire rail length with a soft cloth before lifting the door into place. This step takes under a minute but prevents the single most common cause of early-stage track scratching: metal shavings or drywall dust getting compressed into the rolling surface during the very first movements of a brand-new door.
Step 6: Hang the Door and Check Initial Contact
With the door lifted into the track, observe how the rollers sit before sliding the door at all.
Each wheel should make even, flat contact with the rail. If one side of the door visibly tilts or one roller appears to be riding higher than the others, stop here rather than testing the slide motion, since running an unevenly seated door back and forth will begin wearing the track asymmetrically within the first few cycles.
Use the spirit level across the top of the door panel to confirm it hangs level. A door that's off by even a small degree usually means one bracket needs a height adjustment before moving forward.
Step 7: Fine-Tune Height and Test the Slide Gradually
Once the door is confirmed level, begin adjusting each roller's height incrementally, testing the slide motion after each small adjustment rather than making all changes at once.
This gradual approach makes it easier to isolate which specific roller is causing any resistance or uneven movement, instead of guessing after multiple adjustments have already been made simultaneously.
Slide the door slowly through its full range of motion several times, listening and feeling for any point where resistance increases or the motion feels inconsistent.
A smooth slide across the entire track length, without a section that suddenly feels tighter or looser, is generally the sign that the rollers are correctly seated and evenly loaded.
Common Mistakes That Lead to Track Damage
| Mistake | Why It Causes Damage | How to Avoid It |
|---|---|---|
| Skipping the dry-fit step | Misalignment isn't caught until after drilling | Always test-fit before committing to screw holes |
| Over-tightening bracket screws | Warps the bracket, shifting wheel contact angle | Use a torque-limiting driver, tighten gradually |
| Leaving drilling debris on the track | Acts as an abrasive from the very first slide | Clean the track immediately before hanging the door |
| Setting roller height at full extension by default | Creates uneven pressure if the door isn't perfectly level | Start at mid-range, adjust incrementally after hanging |
| Testing full slide motion before checking initial contact | Uneven seating gets amplified with repeated movement | Confirm level, even contact before any sliding test |
A Note on Roller Material and Installation Sensitivity
The mounting process described above applies broadly across roller materials, but it's worth noting that softer roller compounds tend to show the effects of a slightly imperfect installation sooner than harder ones.
A roller made from a more rigid material can sometimes tolerate a small alignment inconsistency without visible wear for a longer period, simply because it deforms less under uneven pressure.
A softer roller compound, by contrast, may compress unevenly at the point of contact if the bracket isn't seated precisely, making accurate installation somewhat more important when working with those materials.
This isn't a reason to rush installation on any roller type. It's a reason to be particularly careful with the dry-fit and leveling steps when the roller material is known to be more sensitive to uneven loading.
Frequently Asked Questions
How do I know if my track already has damage before I start installing new rollers?
Run a hand along the entire rail length feeling for burrs, dents, or rough patches. Shallow surface scuffs are usually cosmetic, while deeper grooves that catch a fingernail are worth addressing before mounting a new roller, since the new wheel will likely wear faster running over an already damaged section.
Is it necessary to use a torque-limiting driver, or will a regular drill work?
A regular drill can work if used carefully, but it's easier to over-tighten screws without a torque-limiting driver, since there's no built-in signal to stop once the screw is properly seated.
If a torque-limiting driver isn't available, tightening slowly by hand for the final quarter-turn on each screw reduces the risk of over-tightening.
What should I do if the door still feels uneven after adjusting roller height?
Recheck the bracket alignment itself rather than continuing to adjust height, since a bracket that was mounted slightly off-angle during drilling can't always be fully corrected through height adjustment alone.
In some cases, removing and re-mounting the bracket at a corrected angle resolves an issue that height adjustment alone couldn't fix.
How often should the track be cleaned after installation is complete?
This depends on the installation environment, but checking the track periodically for dust buildup, particularly in dusty or high-traffic settings, helps catch early signs of debris accumulation before it has a chance to embed into the rolling surface over repeated use.
Can I reuse an old track when installing new rollers, or does it need to be replaced?
An old track can often be reused if it's free of deep grooves or significant warping. A quick inspection using the method described in Step 1 usually makes it clear whether the existing track is still suitable, or whether continuing to use it would undermine the performance of an otherwise correctly installed new roller.
Getting the Sequence Right Matters More Than Rushing to Finish
Mounting a roller without damaging the track isn't about any single dramatic precaution. It's about following a sequence that catches small problems before they compound into bigger ones: checking the track before assuming it's fine, dry-fitting before drilling, tightening gradually instead of forcing a fit, and testing the slide motion incrementally rather than all at once.
Each step on its own takes very little extra time, but skipping several of them at once is usually what separates an installation that holds up for years from one that starts showing wear within the first few months of regular use.