

 English
 Español
 日本語
日本語Replacing an awning roller can be straightforward when the original component is properly documented before it is removed. The wheel may look simple, but its size is only one part of the information needed for a suitable replacement. The running profile, center opening, mounting method, and relationship with the guide can all affect how the component fits and operates.
Before placing an order, take some time to inspect the existing roller and record the important details. A basic measuring tool, a few clear photographs, and a simple sketch can provide useful information, especially when the original part has no model number or identification mark.
The key is to look at the roller as part of the complete awning assembly rather than treating the wheel as an isolated component.
Key Takeaways
- Measure the wheel size, width, center opening, and running profile before ordering a replacement
- Inspect the mounting structure and available installation space instead of measuring the wheel alone
- Check the guide or track because wear or misalignment can affect how the replacement roller operates
- Use clear photographs and a simple sketch to document unusual shapes or mounting arrangements
- Keep the original roller available when possible, especially when sourcing a non-standard or customized component
Why Accurate Measurements Matter
A replacement wheel can look almost identical to the original and still differ in ways that affect installation. Small changes in the mounting arrangement, wheel profile, or center opening can prevent the part from fitting the existing structure as intended.
This is why visual comparison alone is often not enough.
A useful inspection should cover three areas:
- The wheel and its running surface
- The mounting arrangement
- The guide or surface where the wheel travels
Together, these details provide a clearer description of the existing component and make communication with a supplier easier.
For older awning systems, this information can be particularly useful when there is no part number or the original component is no longer readily available.
Start With the Complete Assembly
Before removing the roller, inspect how it sits inside the awning mechanism.
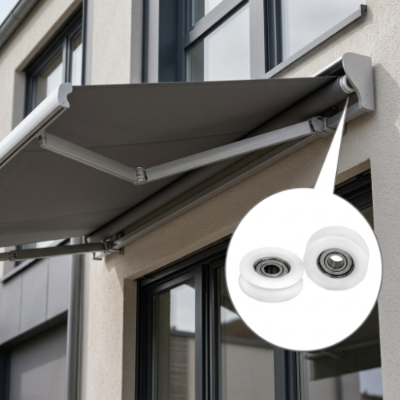
Take several photographs while the component is still installed. Include the surrounding bracket, shaft, guide, housing, or other parts that help show its position.
A useful set of photographs can include:
- The complete assembly before removal
- A close view of the roller
- The side profile
- The front and rear faces
- The mounting point
- The guide or track
- Nearby components that affect the available space
These images provide context that measurements alone cannot always capture.
Record the Installation Direction
Some wheels are symmetrical, but others have a particular orientation. A flange, groove, bearing arrangement, or mounting feature may only appear on one side.
Before disassembly, make a quick note of which direction the component faces.
A photograph is usually enough. If several similar rollers are being removed, a simple label or sketch can also help keep everything organized.
Measure the Main Wheel Dimensions
After removal, place the component on a clean, flat surface. Measuring the part while it is connected to other hardware can make it difficult to identify the correct reference points.
The main wheel dimensions generally provide the starting point.
| Area | What to Check | Purpose |
|---|---|---|
| Overall wheel size | Outside dimension across the wheel | Identifies the general wheel size |
| Wheel width | Width of the wheel body | Helps assess installation space |
| Center opening | Internal opening or bore | Relates to the shaft or axle |
| Running profile | Shape of the contact surface | Shows how the wheel meets the guide |
| Center position | Location of the rotating axis | Helps confirm alignment |
| Mounting arrangement | Shaft, pin, bracket, bearing, or bushing | Describes how the part is installed |
| Guide relationship | Surface where the wheel travels | Provides application context |
The purpose is not to collect every possible measurement. Concentrate on dimensions that describe how the component fits and functions.
Look Closely at the Wheel Profile
The outside size gives only part of the picture. The shape of the running surface can be just as important.
Look at the wheel from the side and check whether the contact surface is flat, rounded, grooved, flanged, or shaped in another way.
A raised edge or recessed section may have a specific relationship with the guide. These details can be difficult to communicate using measurements alone, so a clear side photograph is useful.
Separate Design From Wear
An older roller may have been exposed to repeated movement for a long period. Its surface can become polished, scratched, flattened, or otherwise worn.
Do not automatically assume that every visible mark represents the original design.
If another matching wheel is available and appears less worn, compare the two. Differences between the components may help show which features are part of the original profile and which are the result of use.
This is especially helpful when the running surface has changed noticeably.
Check the Center Opening Carefully
The center of the wheel deserves particular attention because it connects the rotating component to the rest of the mechanism.
Depending on the construction, the center may contain a bearing, bushing, metal insert, shaft connection, or another supporting element.
First identify what is actually present before recording the dimension.
Check whether:
- The center is a simple opening
- A bearing is installed inside
- A bushing is present
- The shaft passes through the component
- The shaft rotates with the wheel
- The wheel rotates around a fixed shaft
These differences can affect the way a replacement component needs to be constructed.
Do Not Overlook the Mounting Structure
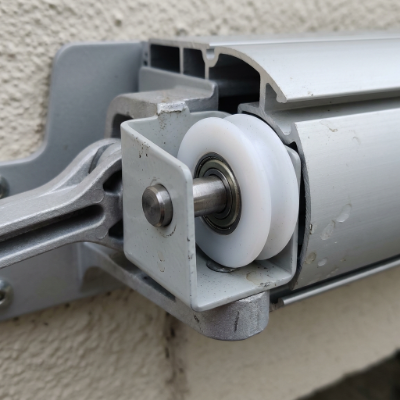
One of the common mistakes during replacement sourcing is concentrating on the wheel while overlooking the way it is installed.
A wheel can have similar outside dimensions to another component but use a completely different mounting method.
Look at the connection between the roller and the awning structure.
It may be supported by:
- A fixed pin
- An axle
- A shaft
- A bracket
- A bearing
- A bushing
- An integrated housing
Take a photograph of the mounting area before disassembly and another after the roller has been removed.
This makes it easier to understand the relationship between the wheel and the surrounding structure.
Check the Available Space
The space around the roller is also worth recording.
Look for nearby brackets, covers, shafts, rails, or other components that could interfere with installation.
A replacement does not only need to correspond with the wheel itself. It also needs to work within the space available in the existing assembly.
Inspect the Guide or Track
The surface where the wheel travels can provide useful information about the component.
Look for marks that show the normal contact area. These can sometimes reveal whether the wheel has been running centrally or making heavier contact with one side.
Also check the surrounding guide for:
- Dirt or debris
- Scratches
- Deformation
- Loose fasteners
- Uneven wear
- Changes in the original shape
If the guide has become damaged or misaligned, replacing the roller alone may not solve the underlying mechanical issue.
This is why the guide should be inspected during the same process rather than treated as a separate concern.
A Clear Photograph Can Explain What Numbers Cannot
Measurements are important, but some shapes are difficult to describe accurately with numbers.
Consider a roller with a curved edge, an offset center, and a small mounting feature on one side. A list of dimensions may describe the part, but a side photograph can show the relationship between those features much more clearly.
For a replacement inquiry, use photographs with good lighting and a simple background.
Try to include:
- One overall view
- One side view
- One close-up of the center
- One view of the mounting area
- One photograph showing the component in its original position
A ruler or measuring tool can also be placed beside the part in one photograph for visual reference.
When a Simple Sketch Becomes Useful
Some rollers are straightforward to describe. Others have unusual shapes or mounting arrangements that are easier to understand through a drawing.
A basic sketch does not need to follow formal engineering drawing standards.
Draw the component from the front and side, then mark the important dimensions. Show the location of the axle or shaft and indicate the surface that contacts the guide.
This can help answer several practical questions:
- Where is the rotating center?
- Which side faces the bracket?
- Which surface contacts the guide?
- Which dimensions belong to the wheel?
- Which dimensions belong to the mounting structure?
For customized components, this type of reference can make communication much easier.
Keep the Original Part Available
If possible, do not dispose of the old roller immediately after taking measurements.
A physical sample can provide information that is difficult to capture in photographs or written notes. It can show the actual wheel profile, bearing arrangement, mounting features, and signs of wear.
This can be particularly useful when the component is unusual or when the original design has no readily identifiable model number.
For manufacturers and suppliers working with non-standard pulley and roller components, a sample combined with drawings, photographs, and application information can provide a useful reference for discussing a replacement or customized design.
Preparing a Clear Replacement Request
Once the inspection is complete, organize the information into a simple specification.
A useful inquiry can include:
- Application: Where the component is used
- Existing component: Description and photographs of the original part
- Wheel information: Main dimensions and running profile
- Center information: Bore, bearing, bushing, or shaft arrangement
- Mounting information: Bracket, axle, pin, or housing structure
- Guide information: Photographs or description of the contact surface
- Condition: Visible wear, cracks, deformation, or other damage
- Quantity: Approximate purchasing requirement
- Sample: Whether the original component can be supplied for reference
- Customization: Whether a standard or customized component is being considered
This gives the supplier a much clearer starting point than a single photograph or one measurement.
For applications involving customized pulleys and rollers, HUNE can use this type of dimensional and application information when discussing non-standard component requirements.
What to Review Before Ordering
Wheel
Check the main dimensions and make sure the running profile has been recorded correctly.
Center
Confirm whether the component uses a simple bore, bearing, bushing, shaft, or another internal arrangement.
Mounting
Compare the original connection with the proposed replacement structure.
Guide
Make sure the wheel profile corresponds with the surface where it operates.
Installation Space
Check the surrounding area for anything that could affect fitting or movement.
Operating Conditions
Consider the environment in which the component is used. Outdoor awning systems may encounter moisture, dust, temperature changes, and repeated movement. These conditions can be relevant when discussing material and construction.
A Practical Measurement Checklist
Before sending the information to a supplier, make sure you have covered the following:
- Photograph the roller before removal
- Record the main wheel dimensions
- Check the side profile
- Inspect the center opening
- Identify any bearing or bushing
- Record the shaft, axle, or pin arrangement
- Photograph the mounting bracket
- Inspect the guide or track
- Note visible wear or deformation
- Check the available installation space
- Prepare a simple sketch if the component has an unusual shape
- Keep the original part available when possible
- Explain how and where the roller is used
- State whether a customized component may be required
Frequently Asked Questions
What measurements should I take before ordering an awning roller? Record the wheel diameter, width, center opening, running profile, mounting arrangement, and available installation space. Photographs of the complete assembly can provide additional context.
Is measuring the outside diameter enough? No. The outside dimension describes only one part of the component. The center arrangement, running profile, mounting structure, and relationship with the guide can also affect compatibility.
Should I keep the original roller after measuring it? When possible, yes. The original part can provide useful information about its profile, mounting features, internal arrangement, and wear condition that may be difficult to capture through measurements alone.
Why should I photograph the roller before removing it? An installed photograph shows the component's orientation and relationship with nearby brackets, shafts, guides, and other parts. This context can help clarify the replacement requirements.
Can a supplier make a customized roller from a sample? A physical sample, combined with measurements, photographs, application information, and mounting details, can provide useful reference information when discussing a non-standard or customized roller.
Good Measurement Starts With the Whole System
A roller may be a relatively small part of an awning assembly, but its dimensions and mounting relationship can have a direct effect on how it fits and moves.
For that reason, replacement sourcing should begin with more than the outside diameter. The wheel profile, center arrangement, mounting structure, guide, and available installation space all provide useful information.
A few clear photographs and carefully recorded dimensions can make the process much easier, particularly when dealing with an older or non-standard component.
The practical approach is simple: inspect the complete assembly, measure the important areas, document the mounting arrangement, and keep the original part available for comparison whenever possible. This gives both buyers and manufacturers a clearer understanding of the component and its role within the awning system.